

Screen printing is a versatile and creative printing method that transforms simple designs into vibrant and lasting works of art. Used widely in industries like fashion, advertising, and fine art, this technique involves transferring a stenciled design onto a surface through a mesh screen. Here’s a step-by-step guide to understanding the fascinating process of screen printing.
Step 1: Designing the Artwork
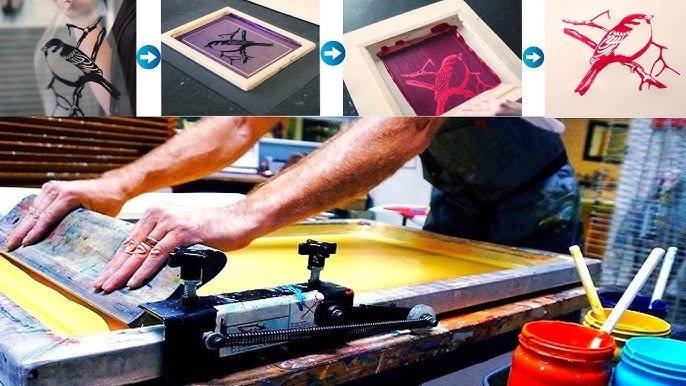
Every screen printing project begins with a design. Artists create or select a design tailored for the medium, whether it’s fabric, paper, or another material. Simple designs with bold lines and limited colors often work best. The artwork is then converted into a digital format, and each color in the design is separated for individual screen preparation.
Step 2: Preparing the Screen
Screens are typically made from a fine mesh material stretched tightly over a frame. The mesh is coated with a light-sensitive emulsion, which hardens when exposed to light. Once the emulsion is dry, the design is transferred onto the screen by exposing it to light through a transparency of the artwork. The areas covered by the design block the light, leaving those parts of the emulsion soft and washable.
Step 3: Washing the Screen
After exposure, the screen is washed with water to remove the soft emulsion, revealing the design as a stencil. The open mesh areas allow ink to pass through during printing. Ensuring the screen is clean and free of excess emulsion is essential for achieving a crisp print.
Step 4: Setting Up the Printing Station
The prepared screen is mounted onto a screen printing press or a stable surface. The material to be printed, such as a T-shirt or a poster, is placed beneath the screen. Proper alignment of the screen and material is crucial to ensure the design prints accurately.
Step 5: Applying the Ink
Ink is poured onto the screen and spread across its surface using a squeegee. The artist or printer uses firm and even pressure to push the ink through the open areas of the stencil onto the material. For multi-color designs, this process is repeated with different screens and inks, allowing each layer to dry before applying the next.
Step 6: Curing the Print
Once the design is transferred, the ink needs to be cured to set it permanently. For fabric prints, this typically involves heat curing using a heat press or a conveyor dryer. Paper prints may air dry or use UV light for curing, depending on the ink used.
Step 7: Cleaning the Screen
After printing, the screen is cleaned thoroughly to remove ink and emulsion, allowing the frame and mesh to be reused for future projects. Proper care of the screen extends its usability and ensures consistent results.
Advantages of Screen Printing
- Vibrancy: Screen printing produces bold and vibrant colors, making it ideal for designs requiring high visual impact.
- Durability: The thick ink layers ensure long-lasting prints, even after repeated washing or exposure.
- Versatility: This technique works on various materials, including fabric, paper, glass, and wood.
Challenges in Screen Printing
While rewarding, screen printing has its challenges. It requires skill and precision to align screens for multi-color designs. The setup process can be time-consuming, making it less suitable for small print runs. However, the quality and uniqueness of the results often outweigh these hurdles.
Conclusion
Screen printing is an art form that combines creativity with technical skill. From the meticulous preparation of screens to the satisfaction of seeing a vibrant print come to life, the process is as rewarding as the final product. Whether you’re an artist, a business owner, or a hobbyist, screen printing offers endless possibilities for expressing your ideas